编译生成过程:
1.建立dll工程
选择新建visual c++的

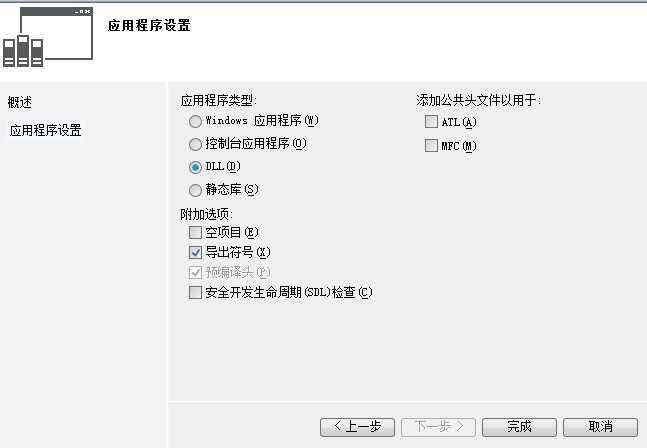
这两个类型工程,都会出现下面界面,在这里设置生成dll:
2.设置项目:
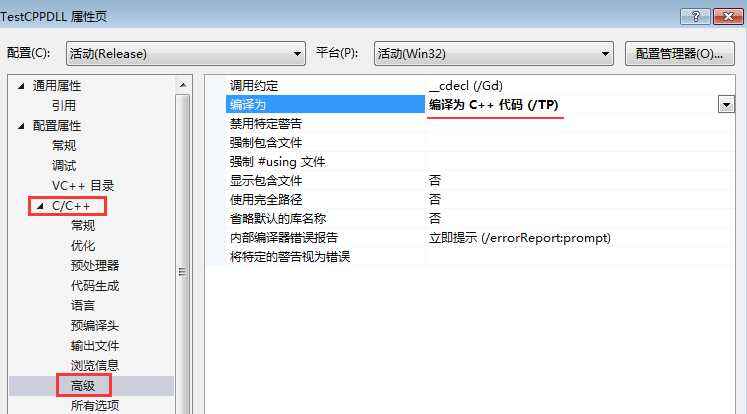
项目属性中设置:
3.相关代码:
由于项目的名称是"testcppdll",因此,会自动生成testcppdll.h和testcppdll.cpp两个文件,.h文件是要导出内容的声明文件,为了能清楚的说明问题,我们将testcppdll.h和testcppdll.cpp两个文件中的所有内容都删除,然后在testcppdll.h中添加如下内容:
头文件:
#define testcppdll_api __declspec(dllexport) extern_c testcppdll_api int __stdcall add(int a, int b);
源文件:
testcppdll_api int __stdcall add(int a, int b)
{
    return a + b;
}
测试过程如下:
新建一个c#空工程项目,修改生成的main文件:
1.添加
using system.runtime.interopservices;
2.在静态方法中添加:
        [dllimport(@"g:/vs13_project/testcppdll/release/testcppdll.dll", entrypoint = "add")]
extern static int add(int a, int b);
具体如下:
using system; using system.collections.generic; using system.linq; using system.text; using system.threading.tasks; using system.runtime.interopservices; //加上这行namespace testc { class program { [dllimport(@"g:/vs13_project/testcppdll/release/testcppdll.dll", entrypoint = "add")] externstaticint add(int a, int b); staticvoid main(string[] args) { int c = add(1, 2); console.write(c); console.read(); } } }
【说明】:本文章由站长整理发布,文章内容不代表本站观点,如文中有侵权行为,请与本站客服联系(QQ:254677821)!